Pi Coding Agent - Architecture and Hands-on Guide
- What Is Pi Coding Agent?
- Pi's Design Philosophy
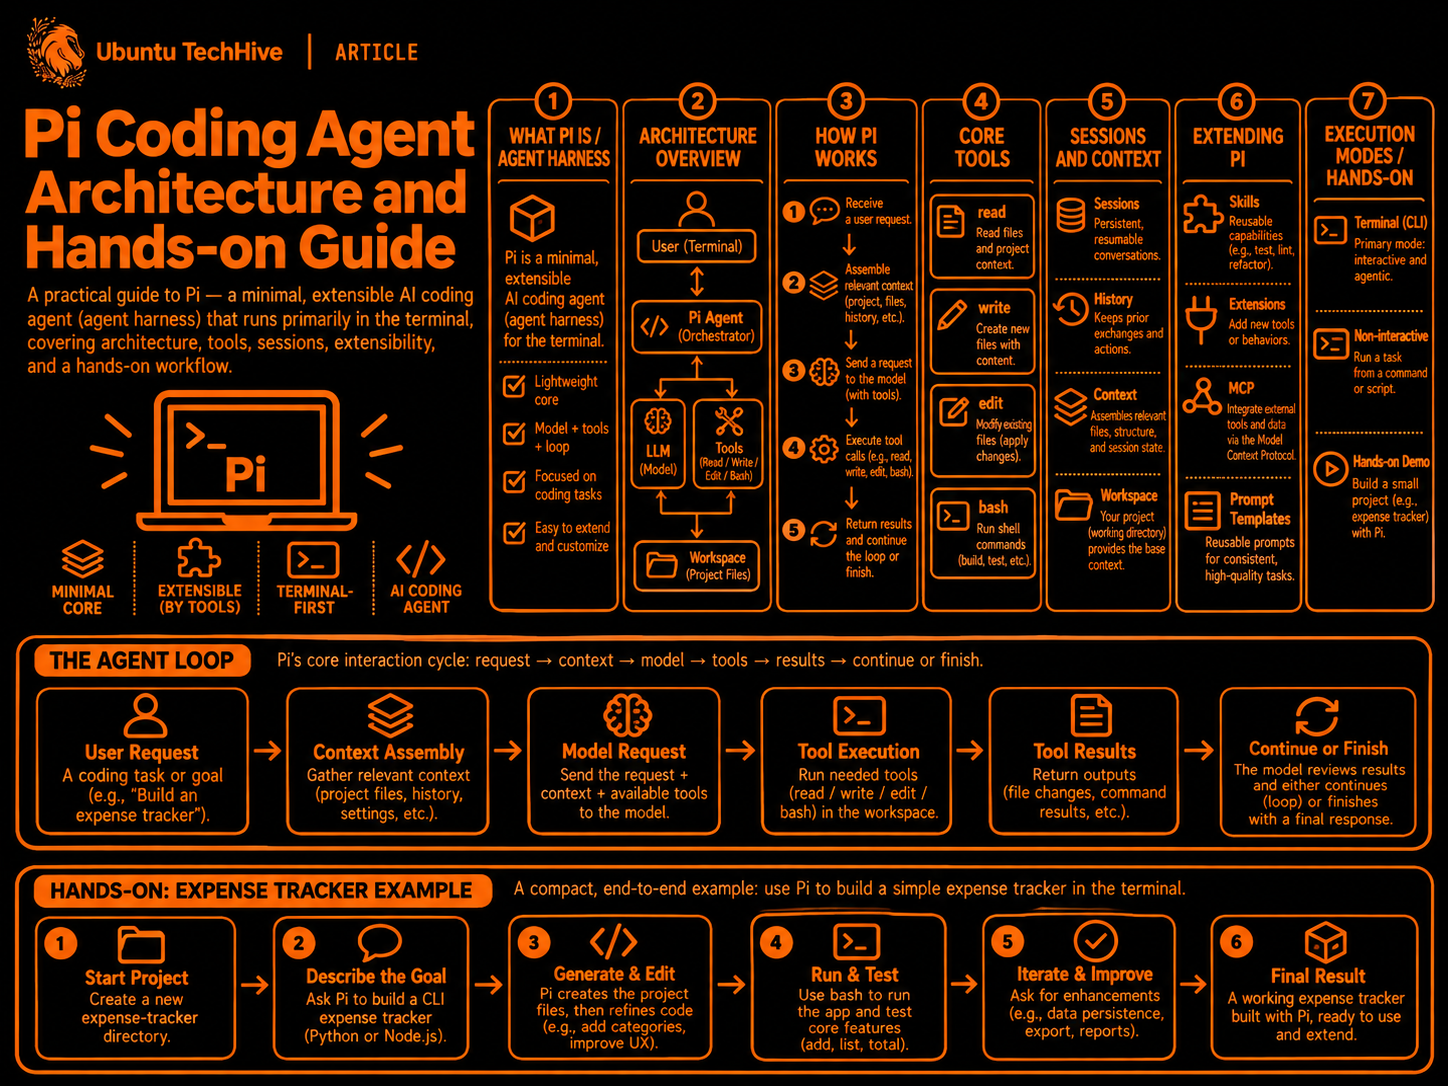
- Pi Architecture Overview
- How Pi Works
- Tools in Pi
- Context Management and Sessions
- Model Providers
- Extending Pi
- Pi Execution Modes
- Installation and Minimal Setup
- Essential Commands
- Hands-on Demo: Expense Tracker
- Security Considerations
- Pi Compared with Other Tools
- Key Takeaways
- References
What Is Pi Coding Agent?
Pi is a minimal, extensible AI coding agent that runs primarily in the terminal.
It allows developers to use large language models (LLMs) to interact with their local development environment.
Pi can:
- Read and understand existing code.
- Create new files and applications.
- Modify existing code.
- Execute terminal commands.
- Run tests and debug errors.
- Manage conversation history.
- Connect to different LLM providers.
- Extend its capabilities with custom tools and skills.
- Integrate external services through MCP.
Pi is an example of an Agent Harness.
What Is an Agent Harness?
An Agent Harness is the software infrastructure surrounding a language model that enables it to perform actions.
The harness is responsible for:
- Building the model's context.
- Communicating with the LLM.
- Providing tools to the LLM.
- Executing requested tool calls.
- Returning tool results to the model.
- Managing conversations and sessions.
- Controlling the execution lifecycle.
The LLM provides reasoning capabilities.
The harness provides the environment in which that reasoning can be translated into actions.
Pi vs. a Traditional Chatbot
A traditional chatbot generally follows this pattern:
flowchart LR
    A["User"] --> B["Prompt"]
    B --> C["LLM"]
    C --> D["Response"]
An AI coding agent adds an execution environment:
flowchart TD
    A["User"] --> B["Pi Agent"]
    B --> C["LLM"]
    C --> D{"Tool needed?"}
    D -->|Yes| E["Execute Tool"]
    E --> F["Return Result"]
    F --> C
    D -->|No| G["Final Response"]
Example:
Chatbot: "Here is Python code that calculates expenses."
Pi: "I created the Python files, executed the program, ran tests, and fixed an error."
The important difference is the ability to interact with an actual environment.
Pi's Design Philosophy
Pi follows a minimalist philosophy.
Rather than providing every possible feature as part of its core implementation, it emphasizes extensibility.
The guiding idea is:
"Adapt Pi to your workflow, not the other way around."
Core Principles
Minimalism:
- Keep the core relatively small.
- Avoid unnecessary abstractions.
- Build on existing operating system tools.
Extensibility:
- Create custom tools.
- Build extensions.
- Use reusable skills.
- Connect external services.
Model Independence:
- Use different LLM providers.
- Switch models within the same environment.
- Compare model behavior.
Transparency:
- Observe model responses.
- Inspect tool executions.
- Review modifications.
- Examine session history.
What Pi Does Not Require
A basic Pi setup does not require:
- A vector database.
- A separate orchestration server.
- Kubernetes.
- Docker.
- A complex multi-agent framework.
- A custom backend application.
For a basic demo, a terminal, a supported LLM, and a local directory are sufficient.
Pi Architecture Overview
Pi contains several logical layers.
High-Level Architecture
flowchart TB
    USER["Developer"]

    subgraph PI["Pi Coding Agent"]
        UI["Terminal Interface"]
        CORE["Agent Runtime"]
        CONTEXT["Context Manager"]
        SESSION["Session Manager"]
        TOOLS["Tool Execution"]
        EXT["Extensions / Skills"]
        API["LLM API Abstraction"]
    end

    subgraph MODELS["LLM Providers"]
        OPENAI["OpenAI"]
        ANTHROPIC["Anthropic"]
        GOOGLE["Google"]
        LOCAL["Local Models"]
    end

    subgraph SYSTEM["Development Environment"]
        FILES["File System"]
        BASH["Shell"]
        GIT["Git"]
        TESTS["Tests"]
    end

    USER <--> UI
    UI <--> CORE

    CORE <--> CONTEXT
    CORE <--> SESSION
    CORE <--> TOOLS
    CORE <--> API

    EXT --> CORE

    API <--> OPENAI
    API <--> ANTHROPIC
    API <--> GOOGLE
    API <--> LOCAL

    TOOLS <--> FILES
    TOOLS <--> BASH
    TOOLS <--> GIT
    TOOLS <--> TESTS
This is a conceptual architecture, showing the major responsibilities rather than every internal dependency.
Pi's Internal Packages
Pi is developed as a collection of TypeScript packages.
pi-ai
A unified interface for working with different LLM providers.
Responsibilities:
- Model requests.
- Model responses.
- Streaming.
- Provider-specific integrations.
- Tool-call representation.
pi-agent-core
The agent runtime.
Responsibilities:
- Agent execution loop.
- Tool calling.
- Agent state.
- Message handling.
- Execution events.
pi-coding-agent
The coding agent application.
Responsibilities:
- CLI.
- Coding tools.
- Sessions.
- Context files.
- Extensions.
- Skills.
- User configuration.
pi-tui
Terminal User Interface components.
Responsibilities:
- Terminal rendering.
- Input handling.
- Interactive components.
- Displaying agent activity.
Package Relationship
flowchart TD
    USER["Developer"]
    TUI["pi-tui"]
    CODING["pi-coding-agent"]
    CORE["pi-agent-core"]
    AI["pi-ai"]
    LLM["LLM Providers"]

    USER <--> TUI
    TUI <--> CODING
    CODING <--> CORE
    CORE <--> AI
    AI <--> LLM

    CODING --> FS["Tools"]
    CODING --> SESSION["Sessions"]
    CODING --> EXT["Extensions"]
The same agent infrastructure can also be used through non-interactive interfaces.
How Pi Works
Pi follows a repeated interaction cycle between the user, the agent runtime, the language model, and tools.
This is commonly called the Agent Loop.
Step 1 - User Submits a Request
Example:
"Create a Python application that tracks expenses."
Pi receives this request through its terminal interface.
Step 2 - Context Assembly
Before contacting the LLM, Pi prepares the context.
This can include:
- System instructions.
- User request.
- Active conversation history.
- Available tools.
- Project instructions from AGENTS.md.
- Skill descriptions.
- Relevant file content.
- Model configuration.
The active session branch determines which historical messages are included.
Step 3 - Model Request
Pi sends the prepared request to the selected LLM provider.
The LLM can produce:
- Natural language text.
- Structured tool calls.
- A combination of both.
Example tool request:
Tool: write File: expenses.py Content: Python source code
The LLM does not directly write the file.
It requests that Pi execute the operation.
Step 4 - Tool Execution
Pi receives the requested tool call.
The tool executor performs the action.
Examples:
- Read a file.
- Write a file.
- Modify code.
- Execute a shell command.
Pi then captures the result.
Step 5 - Return Tool Results
The output is returned to the agent runtime.
Example:
Tool: bash Command: python expenses.py
Result: Traceback: NameError …
The result becomes part of the context available to the LLM.
Step 6 - Continue or Finish
The LLM may decide to:
- Call another tool.
- Modify the code.
- Run additional tests.
- Provide a final answer.
Pi repeats the process while more execution is required.
This interaction is the foundation of agentic behavior.
Complete Agent Loop Diagram
flowchart TD
    START["User Request"]
    CTX["Build Context"]
    CALL["Call LLM"]
    RESPONSE["Receive Model Response"]
    DECISION{"Tool Calls?"}
    EXEC["Execute Tools"]
    RESULT["Collect Tool Results"]
    FINISH["Final Response"]

    START --> CTX
    CTX --> CALL
    CALL --> RESPONSE
    RESPONSE --> DECISION

    DECISION -->|Yes| EXEC
    EXEC --> RESULT
    RESULT --> CALL

    DECISION -->|No| FINISH
Sequence Diagram
sequenceDiagram
    autonumber
    actor User
    participant Pi as Pi Agent
    participant LLM
    participant Tools
    participant OS as Operating System

    User->>Pi: Create an expense tracker
    Pi->>Pi: Assemble context
    Pi->>LLM: Send prompt and tool definitions

    LLM-->>Pi: Request write tool
    Pi->>Tools: write expenses.py
    Tools->>OS: Create file
    OS-->>Tools: Success
    Tools-->>Pi: Tool result

    Pi->>LLM: Continue with result
    LLM-->>Pi: Request bash tool
    Pi->>Tools: Run Python program
    Tools->>OS: Execute command
    OS-->>Tools: Output
    Tools-->>Pi: Execution result

    Pi->>LLM: Continue
    LLM-->>Pi: Final response
    Pi-->>User: Task completed
Why This Matters
Three responsibilities are separated:
- LLM: Generates reasoning and proposes actions.
- Agent Harness: Coordinates execution and manages context.
- Tools: Perform operations in the environment.
This architecture is also fundamental to many other AI agent implementations.
Tools in Pi
Pi's minimal coding configuration uses four fundamental tools.
read
Read file contents.
Example prompt:
"Read app.py and explain its structure."
write
Create or overwrite files.
Example prompt:
"Create a Python program that prints Hello TechHive."
edit
Modify existing files.
Example prompt:
"Modify the program to accept a username."
bash
Execute shell commands.
Example prompt:
"Run the program and display the result."
Tool Execution Example
flowchart TD
    A["User: Fix the bug"]
    B["LLM analyzes request"]
    C["read: Inspect code"]
    D["edit: Fix code"]
    E["bash: Run tests"]
    F{"Tests pass?"}
    G["Final response"]

    A --> B
    B --> C
    C --> D
    D --> E
    E --> F
    F -->|No| B
    F -->|Yes| G
Additional built-in tools and extensions may be available depending on the version and configuration.
Context Management and Sessions
What Is Context?
Context is the information supplied to the LLM for a model request.
It may include:
- Current user request.
- Conversation history.
- Tool results.
- System instructions.
- Project instructions.
- Skill descriptions.
- Referenced file content.
Pi does not automatically load every file in a repository into the LLM context.
It selects and assembles context based on the session and configured resources.
AGENTS.md
AGENTS.md is a project instruction file.
Example:
# Project Instructions

This project is for a coding-agent workshop.

Guidelines:
- Use Python.
- Prefer the standard library.
- Keep code simple.
- Write readable functions.
- Add tests for new features.
- Explain major changes.
These instructions help guide the agent's behavior within the project.
Sessions
Pi maintains conversation sessions.
Sessions can include:
- User messages.
- Assistant messages.
- Tool calls.
- Tool results.
- Model changes.
- Context compaction events.
Persistent sessions use JSONL files.
Session Branching
Pi supports a tree-based conversation structure.
flowchart TD
    A["Start Session"]
    B["Create Application"]
    C["Add Data Storage"]

    D["CSV Approach"]
    E["SQLite Approach"]

    F["Test CSV"]
    G["Test SQLite"]

    A --> B
    B --> C
    C --> D
    C --> E
    D --> F
    E --> G
Branches allow exploration of alternative approaches from earlier conversation states.
Context Compaction
Long conversations can exceed a model's context window.
Pi can summarize older context to reduce the amount of information sent in future model requests.
Command:
/compact
Compaction helps manage context size but can lose some details from older messages.
The original session entries can remain in the stored session history.
Model Providers
Pi can work with multiple LLM providers.
Examples:
- OpenAI.
- Anthropic.
- Google.
- Other supported providers.
- Configured local models.
Model Independence
flowchart TD
    USER["Developer"]
    PI["Pi Agent"]
    API["Unified Model Interface"]

    USER --> PI
    PI --> API

    API --> A["OpenAI"]
    API --> B["Anthropic"]
    API --> C["Google"]
    API --> D["Local Model"]
Advantages:
- Flexibility.
- Model comparison.
- Provider choice.
- Cost optimization.
- Experimentation.
Model capabilities and compatibility can vary.
Extending Pi
Pi can be customized without modifying its core.
AGENTS.md
Project-specific instructions.
Prompt Templates
Reusable prompts for recurring activities.
Examples:
- Code review.
- Documentation.
- Test generation.
- Refactoring.
Skills
Reusable instructions and supporting resources for specialized workflows.
Examples:
- Python testing workflow.
- Deployment workflow.
- Documentation generation.
- API development.
Extensions
TypeScript-based customization.
Extensions can:
- Define custom tools.
- Register commands.
- React to lifecycle events.
- Integrate external services.
- Customize interactive behavior.
MCP Integration
MCP stands for Model Context Protocol.
It provides a standardized way for applications to access external tools and resources.
Modern Pi versions provide built-in MCP support.
Example integrations:
- GitHub.
- Databases.
- Internal applications.
- Remote services.
Extension Architecture
flowchart TD
    PI["Pi Agent"]

    PI --> A["AGENTS.md"]
    PI --> B["Prompt Templates"]
    PI --> C["Skills"]
    PI --> D["Extensions"]
    PI --> E["MCP"]

    D --> F["Custom Commands"]
    D --> G["Custom Tools"]
    D --> H["Event Handlers"]

    E --> I["External Services"]
Pi Execution Modes
Pi supports multiple interfaces.
Interactive
Launch the terminal interface.
piPrint Mode
Execute a prompt and print its response.
pi -p "Explain Python decorators"JSON Mode
Stream structured agent events.
pi --mode json -p "Explain this project"RPC Mode
Control Pi using JSONL messages through standard input and output.
SDK
Embed Pi agent capabilities in TypeScript applications.
flowchart TD
    CORE["Pi Agent Runtime"]

    CORE --> A["Interactive TUI"]
    CORE --> B["Print / JSON"]
    CORE --> C["RPC"]
    CORE --> D["TypeScript SDK"]

    A --> E["Developer"]
    B --> F["Automation Scripts"]
    C --> G["External Application"]
    D --> H["Custom Agent Application"]
Installation and Minimal Setup
Install Pi
macOS / Linux:
curl -fsSL https://pi.dev/install.sh | shWindows PowerShell:
irm https://pi.dev/install.ps1 | iexAlternative using npm:
npm install -g --ignore-scripts @earendil-works/pi-coding-agentThe npm installation requires Node.js 22.19 or newer.
Verify Installation
pi --versionCreate a Project
mkdir pi-techhive-demo
cd pi-techhive-demo
git init
Start Pi
piConfigure Authentication
Inside Pi:
/login
Select a supported provider and authenticate.
Then:
/model
Select the model you want to use.
Essential Commands
| Command | Purpose |
|---|---|
| /login | Authenticate a model provider |
| /model | Select a model |
| /thinking | Set thinking level |
| /settings | Open settings |
| /new | Start new session |
| /resume | Resume session |
| /session | Session information |
| /tree | Navigate conversation history |
| /fork | Fork from earlier message |
| /compact | Compact context |
| /mcp | Manage MCP servers |
| /reload | Reload resources |
| /export | Export session |
| /share | Share session |
| /quit | Exit Pi |
Enter / in the terminal interface to discover the commands available in the installed version.
Hands-on Demo: Expense Tracker
Create a Project Directory
mkdir expense-tracker
cd expense-tracker
git init
pi
Explore the Project
Prompt:
Inspect the current directory.

Explain what files are present.

Do not modify anything.
Concept: File-system exploration and read operations.
Generate an Application
Prompt:
Create a simple Python expense tracker.

Requirements:
- Add an expense.
- List expenses.
- Calculate total expenses.
- Store expenses in a CSV file.
- Use only the Python standard library.

Keep the implementation simple.
Concept: Code generation and file creation.
Execute the Program
Prompt:
Run the application.

Create three example expenses.

Verify that the total is calculated correctly.
Concept: Shell execution and result observation.
Add Automated Tests
Prompt:
Create unit tests using Python unittest.

Test expense creation and total calculation.

Run the tests and fix any errors.
Concept: Autonomous testing and iterative correction.
Extend the Application
Prompt:
Add a feature to group expenses by category.

Display the total for each category.

Update the tests and run them.
Concept: Code modification and context retention.
Explore Session Management
Commands:
/session /tree /model
Concept: Session history, branching, and model switching.
Security Considerations
Pi can execute commands with the permissions available to its running process.
It does not necessarily request approval before every tool call.
Recommended practices:
- Work inside a dedicated project directory.
- Use Git before modifying important code.
- Avoid exposing credentials.
- Inspect generated code.
- Review external extensions.
- Do not use sensitive data in public demos.
- Use containers or sandboxes for untrusted tasks.
- Review session contents before sharing them.
An AI coding agent is not a replacement for security and code-review practices.
Pi Compared with Other Tools
Pi
Minimal, extensible coding-agent harness.
Strengths:
- Customization.
- Multiple LLM providers.
- Tool execution.
- Session management.
- Extensibility.
Claude Code
Coding agent with an integrated set of development tools and workflows.
Codex CLI
Coding agent designed to work with codebases, terminal commands, and development workflows.
LangChain / LangGraph
Frameworks for developing custom LLM applications and agentic workflows.
Pi is primarily a ready-to-use and extensible agent harness, rather than a general-purpose workflow-graph framework.
Key Takeaways
- Pi is an Agent Harness, not an LLM.
- The LLM proposes actions; Pi coordinates execution.
- The Agent Loop enables multi-step task execution.
- Tools allow Pi to interact with a development environment.
- Context and sessions maintain conversation continuity.
- Pi is not tied to a single LLM provider.
- Extensions and Skills enable customization.
- Minimal architectures can still support sophisticated agentic workflows.
- Human oversight and appropriate isolation remain important.
References
Pi website: https://pi.dev
Official documentation: https://docs.pi.dev/latest
Quickstart: https://docs.pi.dev/latest/quickstart
How Pi Works: https://docs.pi.dev/latest/how-pi-works
Slash commands: https://docs.pi.dev/latest/slash-commands
Extensions: https://docs.pi.dev/latest/extensions
MCP: https://docs.pi.dev/latest/mcp
Source code: https://github.com/earendil-works/pi
Mermaid editor: https://mermaid.live